DPI - PROJECT 2B / Poster Design

Felice Jolin
Week 7 - Week 10 (5/11/24 - 26-11/24)
Digital
Photography and Imaging
Project 2B
TABLE OF CONTENT
INSTRUCTION
We were required to create a poster design composition using elements of photography, typography and vector graphics. Photography is from DPI. Typography and vector graphics is from IVN.
MOODBOARD REFERENCE
I am going with fairytale theme for this project, therefore I searched for
castle and fairytale poster through pinterest and google and found out these 3 that pick my interest.


Fig. 1.1 Reference (Week 7, 5/11/24)
QUOTE
Be the sparkle in your own fairytale
Summary of your design concept: The design will be showing I am entering the door into my fairytale. I will be entering my world of fairytale, the beginning of a new journey to discover your own spark. It will be a magical moment as you walk through into your own fairytale.Soft, sparkling lights surround you, ready to create your own story too.The scene is full of bright colors, with glittering light following you.
SKETCH

Fig. 1.2 Sketch (Week 8, 12/11/24)
DIGITISE
1. I gather the photography I want to use from my
gallery.


2. I start to draw the key shaped door into the fairytale, inserted my quote,
the castle picture and myself. This was done in Adobe Illustrator.
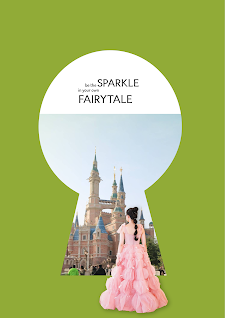


Fig. 1.7 Castle Edit #2 (Week 9, 19/11/24)
.png)
.png)


Fig. 1.12 Edit Sparkle on dress (Week 10, 26/11/24)
.png)


Fig. 1.15 Edit Sparkle on fl (Week 10, 26/11/24)
12. Lastly, I add some details in Illustrator and also using the brush tool to finalize my design.
FINAL

Fig. 1.16 Final Poster (Week 10, 26/11/24)
I was inspired by the Disney theme and took a Disney castle picture from my gallery. The concept is the key-shaped gate into the fairytale where I’ll be entering. In this magical space, I would like to portray that you can be your true self. You’re not just stepping into a dream, but also shining as your own special sparkle.
As for my typographic quote ‘Be the sparkle in your own fairytale’. I would like to highlight the word ‘sparkle’ and the person in the middle. To show that you can be your own sparkle. I curated it as dreamy as I could, I modified the font to curl at the edge to show flawlessness and also added sparkle to make it shine. In addition, I added sprinkles surrounding the dress.
REFLECTION
Experience : At first, I was struggling to compose and balance the photography and typography. However after several trials and practice, I am able to manage it.
Observation : To make a design balance, the photography should not overpower the typography, where in my case, I changed the background from vibrant colour into something more dark tone. Going through this project, I am able to see other peers work too, everyone has their own style and uniqueness in portraying the words and photography.
Findings : Feedback from Mr. Fauzi and Mr. Hafiz is very important for me to be able to bring this output. Overall, I ejoy doing this task and I had new experience in exploring Photoshop and try something new. Lastly, I would like to thank Mr. Fauzi for the guidance and help.

.png)
Komentar
Posting Komentar